Step 2: Remove the affected wheel (continued)
If the flat tire is the front tire, simply lift it from the bike. It may take some effort to get it loose; be patient and not too forceful. Use a lubricant like Ballistol, Break-Free or WD-40 if needed.
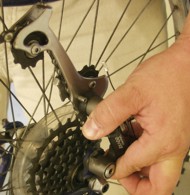
If your back tire is flat, you will need to lift the wheel away from both the bike frame and the chain. If you have a multi-gear bike, you will find that the rear derailleur -- the part that looks like a leg with a gear sprocket on the end, is on a hinge. Hold it back with one hand, and gently remove the wheel with the other, making sure it is clear of the chain.
 |
 |
Step 3: Remove the tube
First, mark the valve stem location on the tire sidewall. Also, mark the locations of any sharp items you found in your tire. The chalk or crayon you added to the repair kit works well for this. This will help you find the hole in both the tube and the tire, by aligning the valve stem to the mark on the tire and comparing hole locations.
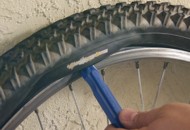
Use a tire lever to "dig" the edge of the tire out of the rim. Use the blunt end to lever the tire out, and hook the other end to a spoke. Unless using a quick-type single tire lever, insert a second tire lever under the tire sidewall, and run it around until the tire sidewall is outside the rim. If using a quick lever, simply run it around the edge until the sidewall is out.
Gently grasp the inner tube under the tire and pull one portion of the tube out. Depending on how large the hole or gash is in the tube, there may or may not be some air remaining in the tube. Work your way around the rim pulling the tube out in sections, until it is out into the open. Unscrew the valve stem cover, if you did not do that already. Then, gently lift the valve stem out through the hole.
With the tube out, turn it around in your hands and look for obvious damage gashes caused by ruptures or large holes caused by abrasions or a large puncture. Such damage should only be present in tubes that are completely flattened. If your tube has this kind of damage, you will need to replace it.
Step 4: Find the puncture hole or leak
If your tube does not have a large hole, it probably has a small puncture; most punctures can be repaired, using your patch kit. There could, however, be a leak through the valve or a seam on the tube. Sometimes, these leaks can be repaired. If you don't see an obvious hole in your tube, but you found a nail or tack in your tire, align the valve stem with the valve stem mark on your tire. Use the chalk or crayon to mark the tube at that puncture site.
Punctures and leaks may or may not completely empty the tube, even if your tire was riding flat. You can use a look, listen and feel approach similar to the one taught in CPR, to find a hole or leak where air is coming out. Steps for this method are listed on the next page.
All rights reserved