© The University of New Mexico, Albuquerque, NM 87131, (505) 277-0111

Create and post a simple webpage. Include at least three figures from the exercises you worked in Chapter 3 of Getting to Know ArcGIS. Send me an e-mail with the url if it is different from your NetID. (Further instructions below can assist you in creating your webpage.)
Web Page Publishing Summary
(UNM Information technology (IT) provides information on creating and posting a webpage at http://it.unm.edu/web/creating.html)
Creating Images (jpegs) from the ArcMap Environment
In the ArcMap environment, use File > Export Map to create a jpeg for use in a webpage, document, or slide presentation. Note that when you use Options, you can change the resolution of the jpeg image.
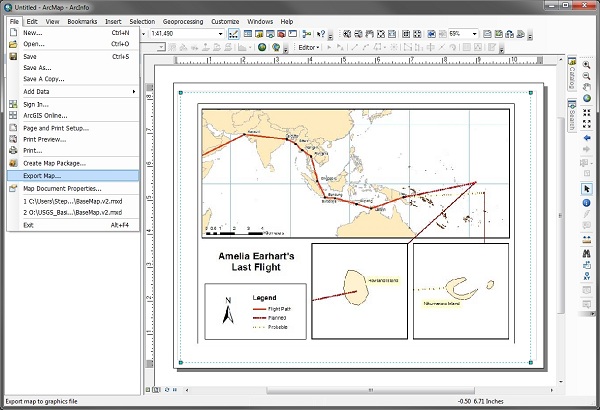
If you’d like a figure where you show other parts of the screen (like the one above), you can use the Snipping Tool included in Windows 7. If you have an older operating system, use Ctrl – Print Screen to capture a bitmap image of everything showing on the screen. (Note that some operating systems use Shift – Print Screen). From the Start Menu, go to Programs, Accessories, then Paint. Once you open Paint, simply paste the bitmap. You can use Paint to cut out pieces of the Bitmap and copy them to other programs. You can also save the bitmaps as jpeg files using File > Save As.
Let's create a simple web page using Microsoft Word.
This text is a different font and size.
This text is a different color.
Using the Insert tab then Clip Art, I've insert the following picture.

I'm now inserting the picture again, then with the picture selected, click the right mouse button to format the picture. I've enlarged and centered the picture.

Now save the document as a Word document
Next, Select 'Save as' and choose "Web Page" from the 'Save as type:' drop down menu. This dialog box also provides an opportunity to “Change Title...” of your web page. Saving as "Web Page" creates a file (html) and a directory of figures.
Once you've saved as Web Page, your menus will change slightly.
Add a background using the Page Layout tab on the ribbon and Page Color. You may choose a solid color or "Fill Effects". By going to Fill Effects you will have a variety of options for backgrounds.
While on the Page Layout tab, insert a line using Page Borders then Horizontal Line... A wide assortment of lines are available within Word and more can imported from external sources.
Let's create a link to the class homepage www.unm.edu/~jcoonrod/GIS
If you type a web address, as above, Word will automatically create the hyperlink.
Now simply type class homepage. Then highlight the text and from the toolbar select the icon showing a world with a small link
![]() . Type in the appropriate information.
. Type in the appropriate information.
Now, create a link for someone to send you e-mail. Type contact me. Highlight the text and from the toolbar select the icon showing a world with a small link
![]() This time type "mailto:jcoonrod@unm.edu" Once again, word will automatically provide the link when you explicitly type the e-mail address.
This time type "mailto:jcoonrod@unm.edu" Once again, word will automatically provide the link when you explicitly type the e-mail address.
Insert a table using the Insert Tab and Table. This is an easy way to align text. I've inserted a 3 x 10 table and then inserted the names of students taking this course. To create links to each students webpage, I highlighted the name then press the insert hyperlink
![]() and fill in the address of the link.
and fill in the address of the link.
Okay, now you have a webpage. Save it.
Now use Windows Explorer to see the file that you’ve created. I saved my Word document as sampleweb.doc. I saved my webpage as sampleweb.htm. Within the directory that I am working, I should see these two files. Additionally, I find a folder named sampleweb_files. Four images have been placed in that folder. For the webpage to work, those files must be in that folder.
It may also be useful to look at the html code that Word has generated by right clicking on the file and choosing Open with. . . Notepad.
What do you do to "post" the page so that the world can see it?
UNM IT provides information on creating and posting a webpage at http://it.unm.edu/web/creating.html
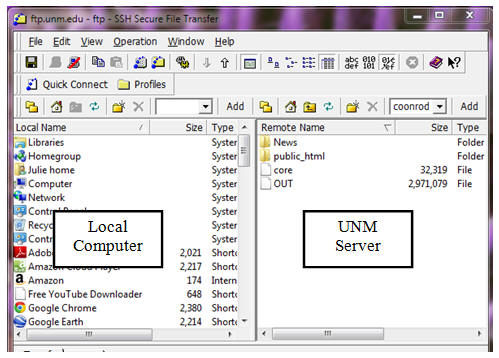
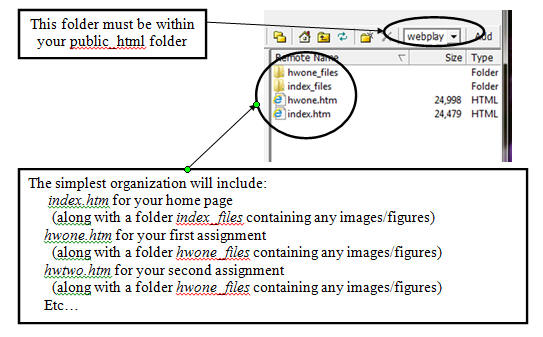
Basically all html files are stored in the public_html directory of your UNM account. For your homepage to simply be www.unm.edu/~youraccountname, you need to have your hompage file named index.html. Everytime you create a new file, you need to ftp the file (and all files that are referenced) to your account. If you transfer files from a remote computer, then you must type webupdate at the prompt for the new file to be readable.
Additional notes:
I am not implying that I believe Microsoft Word to be the best way to create webpages. I believe that using Microsoft Word is a reasonable way for a student who has no knowledge of html to create basic webpages.